Evacuation Zones
These objects introduce Entities for use in evacuation simulations and they can also affect the movements of Entities that happen to walk through them. They enable you to introduce a population to a model, specify the delay between the discovery of a fire and the sounding of an alarm, and also to specify ‘pre-movement’ behaviour which complies with British Standard PD 7974-6 (this behaviour can also be customised).
Evacuation Zones are best used when you want to analyse the performance of a whole model or a specific area of a model in terms of evacuation. Like Populated Zones, they introduce a specified number of Entities into a model but with Evacuation Zones you can specify an alarm time, select the Entity Type of evacuees and define pre-movement behaviour.
While the principle role of an Evacuation Zone is to introduce Entities into a model, they can also be used as filtering objects, meaning that a Demand Line (with an initial population) is not essential. However, in such cases you will need to adjust the 'Entity Filter' settings to ensure that the zone affects at least some Entities.
Setting Evacuation Zone parameters
To set Evacuation Zone parameters:
-
Enter a name, or choose a name from the drop-down list of
imported pending objects, in the 'Name' box.
You may not need to add any Demand Lines as any Entities in the model who happen to be in the zone at the time of the alarm will be affected.
- To add a Demand Line (or Lines), click the New button once for each Demand Line you need.
-
For each Demand Line:
- Double-click in the ‘Entity/Supply Type’ column and select from the available list.
- Double-click in the ‘Population’ column and enter a number.
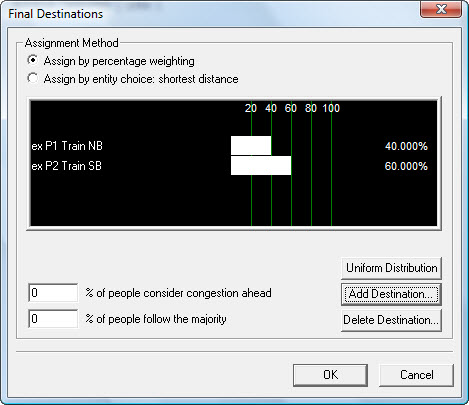
- Double-click in the ‘Final Destinations’ column.
The ‘Final Destinations’ dialog is displayed.
- Select one ‘Assignment Method’ from:
-
To add Final Destinations, click
Add destination.
The ‘Select final destinations’ dialog is displayed.
- Expand the object trees within the dialog box and select one or more destinations (press and hold the <Ctrl> key to select more than one available object).
- Click OK to add the destination(s).
-
If you want to distribute Entities evenly across your
destinations, click
Uniform Distribution.
If you want to input the distribution manually, click next to each destination name and drag the distribution bar to set the percentage (they must equal 100%).
- In the 'Evacuation Options' area, enter an Alarm time in seconds (this will be the number of seconds after the start of the simulation so, for example, if you want to simulate an alarm three minutes into the run-time, enter 180).
- To change all evacuees to a particular Entity Type, check Evacuating entity type and select from the adjacent drop-down list.
-
In the 'Link Options' area, select one of these two options:
If you select 'Specify link', click on the 'Links' tab and add your target objects manually following the steps in Linking methods ).
- If you want to set (or modify) the Entity facing direction, click the 'Additional Parameters' tab and check the box labelled ‘Apply facing direction’.
- Enter a value for ‘degrees’ and a margin of tolerance (of 5 or 10 degrees) in the box labelled ‘+/- degrees’.
- Click on the Pre-movement tab.
- In the drop-down list labelled Type, select either British Standard PD 7974-6 or Custom.
- Click on the Links tab and complete the link details (for further information, see Linking methods ).
- If you want the zone to filter for certain Entities, click on the Entity Filter tab and complete the Filtering parameters (for further information on filtering, see Specifying filter settings ).
- Click OK to save the parameters.